Email Templates
Introduction #
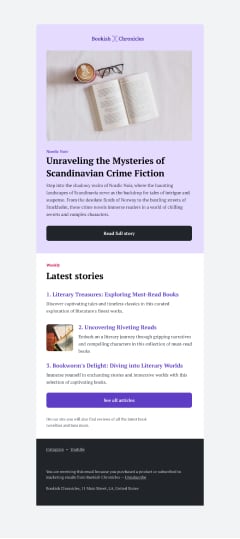
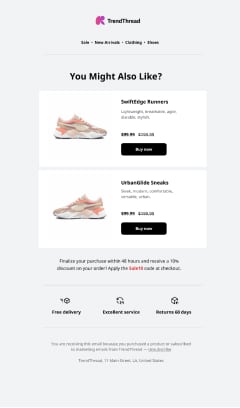
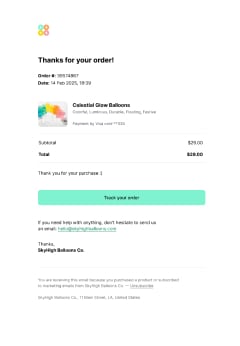
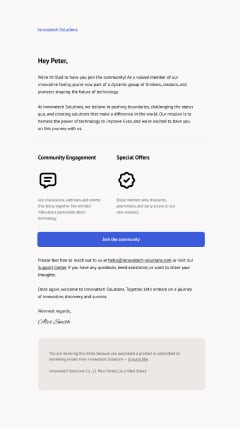
You can create HTML email templates in Redactor with Email plugin. It's very simple, you set or create plain HTML. You can then output an HTML email with special markup that will display correctly in most email clients. Take a look and try how it works in this example:
You can also explore sample templates that we have specially prepared so that there are as many different techniques and markup options as possible:

This functionality is seamlessly integrated as a plugin, available for purchase either individually or bundled with Redactor. You can activate the editor with the Email plugin enabled, along with several other plugins designed to enhance content block styling.
Redactor('#entry', {
    plugins: ['email', 'blockcolor', 'blockbackground',
              'blockborder', 'blockfontsize', 'imageresize',
              'mergetag', 'alignment', 'emoji'],
    pathbar: true,
    image: {
        width: true
    }
});
That's it. No special customizations are required. No special HTML code is required. You just create plain HTML and then get a ready to send Email template via API.
Concept #
The email template is the HTML code that is contained in the editor and can be retrieved using the usual getContent method and set as setContent. This is what a template is. And it stores in its code all necessary settings and styles. So there is no need to store the generated email. You just need to store the regular HTML code that Redactor outputs.
That's the whole idea, that the email template code is simple and is just plain HTML. But when you need to send an email through a sending service or your own tools via SMTP, that's when you can get the generated template via the getEmail API.
This way you don't need to store the generated email. Or you can store both the regular template code received by getContent and the generated email received by getEmail at the same time. But you need to operate and modify only plain HTML.
Email-clients support #
Here is in which clients the emails code has been tested and it displays the same without any problems. This covers about 98% of all email clients where users read emails.
- Gmail
- Apple iPhone/iPad
- Apple Mail
- Outlook.com
- Google Android
- Outlook for Mac OS
- Outlook for Windows
- Yahoo! Mail
Getting generated HTML #
Initially, the email template is just HTML, which cannot be correctly displayed in email clients.
You need to convert this code into a real email. Of course, the plugin will do it for you, you just need to use editor.getEmail() API method.
<!-- template -->
<textarea id="enter">... your template ...</textarea>

<script>
// call editor
let app = Redactor('#entry', {
    plugins: ['email', 'blockcolor', 'blockbackground',
              'blockborder', 'blockfontsize', 'imageresize',
              'mergetag', 'alignment', 'emoji'],
    pathbar: true,
    image: {
        width: true
    }
});

// get content from outside scripts
let content = app.editor.getEmail();

// get content in the plugin method
let content = this.app.editor.getEmail();
</script>
See the example and API method to retrieve the HTML email code.
Create a template #
In most cases, Redactor does not require special markup to create email templates. You create plain HTML and Redactor will convert it into custom email markup that will display correctly in most email clients.
<h1>Heading</h1>
<hr>
<p>Text</p>
<p>
    <img src="..." width="100" height="100">
</p>
The H1 heading will be the heading in the email. The HR tag will be the divider in the template. The text will be the text and the image will be the image.
This way you don't need to learn special markup for emails and think about it. Knowing HTML and some specific element markups is all you need.
By default, the Email plugin has basic style settings and the email will look great already. But you can always create your own styles in several ways, which will be discussed below.
- Change styles with settings;
- Change styles using the built-in styles in the template.
And of course, you can apply CSS styles to any tag in the template by simply specifying it in the style attribute.
<h1 style="color: #5F3DC4">Heading</h1>
<hr style="background: #CCCCCC; height: 4px;">
<p style="font-size: 18px;">Text</p>
<p>
    <img src="..." style="border-radius: 12px;" width="100" height="100">
</p>
You can apply almost any CSS styles to the design of elements in your email.
Create buttons #
Buttons are a very important part of an email to create a call-to-action.
In the template, buttons should be marked with the email-button class.
This way the editor will realize that it is not a link, but a button and will apply special styles to it, set in the settings or specified by you.
<h1>Heading</h1>
<p>Text</p>
<p>
    <a href="https://example.com" class="email-button">Check it out</a>
</p>
By default, the Email plugin will set some styles for the button to make it look like a button. You can set your styles directly in the template, for example, setting a different background and text color for it.
<p>
    <a href="https://example.com" class="email-button" style="background: #FFD43B; color: #000000;">Check it out</a>
</p>
In the example above, the button will have a yellow background and black text.
Create preheader #
Sometimes you need to create a special preheader text in an email, which is shown in the preview in some email clients. For this purpose you can create a tag with class 'email-preheader' and place it at the start of template.
<div class="email-preheader">This is preheader and it will show as a preview in some mail clients.</div>
Or you can specify the preheader in the plugin settings when you start the editor, like this:
let app = Redactor('#entry', {
    plugins: ['email', 'blockcolor', 'blockbackground', 'blockborder', 'blockfontsize', 'imageresize', 'mergetag', 'alignment', 'emoji'],
    pathbar: true,
    image: {
        width: true
    },
    email: {
        preheader: 'This is preheader and it will show as a preview in some mail clients.'
    }
});
Default settings #
Email plugin has a large set of default settings and styles that determine the appearance of the email.
// email lang
lang: 'en',

// dark theme
dark: true,

// title of email
title: '',

// spacing between elements
spacing: '32px',

// font family for heading, text, and button elements
font: 'Helvetica, Arial, sans-serif',

// link to google fonts
linkFont: false,

// email body
body: {
    background: '#ffffff',
    padding: '32px 20px 64px 20px'
},

// content card
content: {
    width: '600px',
    background: '#ffffff',
    padding: '0',
    borderRadius: false,
    border: false
},
text: {
    fontSize: '16px',
    lineHeight: '1.618',
    color: '#333333'
},
h1: {
    fontSize: '36px',
    fontWeight: 'bold',
    lineHeight: '1.3',
    letterSpacing: '0',
    textTransform: 'none',
    color: '#000000'
},
h2: {
    fontSize: '24px',
    fontWeight: 'bold',
    lineHeight: '1.3',
    letterSpacing: '0',
    textTransform: 'none',
    color: '#000000'
},
h3: {
    fontSize: '20px',
    fontWeight: 'bold',
    lineHeight: '1.4',
    letterSpacing: '0',
    textTransform: 'none',
    color: '#000000'
},
h4: {
    fontSize: '16px',
    fontWeight: 'bold',
    lineHeight: '1.4',
    letterSpacing: '0',
    textTransform: 'none',
    color: '#000000'
},
quote: {
    borderLeft: '2px solid #ccc',
    background: false,
    padding: '0 0 0 24px',
    color: '#000000',
    fontWeight: 'bold',
    fontStyle: 'italic'
},
pre: {
    fontFamily: 'monospace',
    fontSize: '14px',
    lineHeight: 1.618,
    padding: '20px',
    borderRadius: false,
    border: false,
    color: '#333333',
    background: '#f5f5f5'
},
link: {
    color: '#046BFB'
},
button: {
    padding: '16px 0px',
    fontSize: '16px',
    fontWeight: '500',
    background: '#000000',
    color: '#ffffff',
    borderRadius: '8px'
},
divider: {
    size: '1px',
    background: '#000000'
}
Customize styles & settings #
Styles and default email settings can be changed in several ways.
Specifying settings when starting the editor
You can specify styles in the editor settings at startup.
let app = Redactor('#entry', {
    plugins: ['email', 'blockcolor', 'blockbackground', 'blockborder', 'blockfontsize', 'imageresize', 'mergetag', 'alignment', 'emoji'],
    pathbar: true,
    image: {
        width: true
    },
    email: {
        body: {
            background: '#f5f5f5'
        },
        text: {
            fontSize: '18px',
            color: '#1a1a1a'
        }
    }
});
In the example above, we specified that the background of the email would be light gray and the text would be 18px and dark color.
Specifying a styles object in the template
You can do the same by specifying a JSON object directly in the template using the email-options class.
<div class="email-options">
{
    "body": {
        "background": "#f5f5f5"
    },
    "text": {
        "fontSize": "18px",
        "color": "#1a1a1a"
    }
}
</div>
<h1>Heading</h1>
<p>Text</p>
The plugin will find the specified styles in the template and apply them as settings. The output email will not contain this object.
Specifying CSS styles for an element
And of course you can use the style attribute on elements in the template to create customized styles.
<h1 style="color: #5F3DC4">Heading</h1>
<hr style="background: #CCCCCC; height: 4px;">
<p style="font-size: 18px;">Text</p>
<p style="padding: 20px; background: #f5f5f5;">
    <img src="..." style="border-radius: 12px;" width="100" height="100">
</p>
You can apply almost any CSS styles to the design of elements in your email.
Dark theme #
By default, the plugin has a dark theme enabled for generated emails. However, only the light theme works in the email editing mode.
The colors of the dark theme are automatically created and override the colors of the light theme. This means that regardless of the email styles in a dark theme, all backgrounds of the email will be dark and all text and links will be light.
You can turn off the dark theme using the settings:
let app = Redactor('#entry', {
    plugins: ['email', 'blockcolor', 'blockbackground', 'blockborder', 'blockfontsize', 'imageresize', 'mergetag', 'alignment', 'emoji'],
    pathbar: true,
    image: {
        width: true
    },
    email: {
        dark: false
    }
});
Or by specifying in the email template:
<div class="email-options">
{
    "dark": false
}
</div>
In this case the email will be displayed in clients with light theme always.
Setting the font #
By default, the email will have a font set like this:
Helvetica, Arial, sans-serif
You can change this by specifying your font set and a link to them in Google Fonts:
<div class="email-options">
{
    "font": "Inter, Helvetica, Arial, sans-serif",
    "linkFont": "https://fonts.googleapis.com/css2?family=Inter:wght@100..900&display=swap"
}
</div>
<h1>Heading</h1>
<p>Text</p>
Or using the settings when you start the editor:
let app = Redactor('#entry', {
    plugins: ['email', 'blockcolor', 'blockbackground', 'blockborder', 'blockfontsize', 'imageresize', 'mergetag', 'alignment', 'emoji'],
    pathbar: true,
    image: {
        width: true
    },
    email: {
        font: "Inter, Helvetica, Arial, sans-serif",
        linkFont: "https://fonts.googleapis.com/css2?family=Inter:wght@100..900&display=swap"
    }
});
Now all text elements of the email get the Inter font.
Spacing #
The Email plugin automatically sets 'margin-bottom' after all first level elements. This is specified in the spacing setting and the default is 32px.
You can change this setting to your own value.
<div class="email-options">
{
    "spacing": "16px"
}
</div>
<h1>Heading</h1>
<p>Text</p>
Or using the settings when you start the editor:
let app = Redactor('#entry', {
    plugins: ['email', 'blockcolor', 'blockbackground', 'blockborder', 'blockfontsize', 'imageresize', 'mergetag', 'alignment', 'emoji'],
    pathbar: true,
    image: {
        width: true
    },
    email: {
        spacing: "16px"
    }
});
Or you can set spacing individually for each element, for example, like this:
<h1 style="margin-bottom: 4px;">Heading</h1>
<p>Text</p>
It's important to remember that the plugin does not set a margin bottom for nested elements, for example:
<h1>Heading</h1>
<p>Text</p>
<div class="email-wrapper" style="padding: 20px; background: #f5f5f5;">
    <h2>My heading inside wrapper</h2>
    <p>My text inside wrapper</p>
</div>
In this case all elements inside the div tag do not get spacing.
It must be specified individually using the style attribute:
<h1>Heading</h1>
<p>Text</p>
<div class="email-wrapper" style="padding: 20px; background: #f5f5f5;">
    <h2 style="margin-bottom: 12px;">My heading inside wrapper</h2>
    <p>My text inside wrapper</p>
</div>
Layouts #
Often email templates require you to create content in columns. The editor has Layouts for this purpose. You can add layouts through the editor interface by clicking the Add (+) button. Just as you can markup a default template, the layout code can look like this:
<h1>Heading</h1>
<p>Text</p>
<div data-block="layout">
    <div data-block="column" style="flex-basis: 50%;">
        <p>Column 1</p>
    </div>
    <div data-block="column" style="flex-basis: 50%;">
        <p>Column 2</p>
    </div>
</div>
Layout can have three columns, four columns, and so on.
You can customize the width of the columns using flex-basis value.
This is often required if there is an image in the first column, so it's worth adding a flex-shrink property so that the image is not squashed in the column.
<div data-block="layout">
    <div data-block="column" style="flex-basis: 106px; flex-shrink: 0">
        <p style="text-align: left;">
            <img src="..." width="106" height="90">
        </p>
    </div>
    <div data-block="column">
        ...
    </div>
</div>
- Layout and its columns will be converted to a table in the output email code.
- In the mobile view, layout columns will stack vertically.
Hide something on mobile #
Sometimes you need to hide something in an email when viewing it on mobile devices.
Use mobile-hidden class for this purpose.
<div data-block="layout" class="mobile-hidden">
    <div data-block="column" style="flex-basis: 50%;">
        <p>Column 1</p>
    </div>
    <div data-block="column" style="flex-basis: 50%;">
        <p>Column 2</p>
    </div>
</div>
In the example above, the first column will not show on mobile devices.
Alignment on mobile #
Use the mobile-left, mobile-right, mobile-center classes to override the alignment of elements when viewing the email on mobile devices.
<p style="text-align: left; margin-bottom: 72px;" class="mobile-center">
    <img src="https://example.com/assets/logo.png" width="40" height="40">
</p>
In the example above, the image will be center-aligned on mobile devices.
Translations #
Email plugin by default, contains the following object with language variables:
translations: {
    en: {
        "email": {
            "button": "Button",
            "mobile-view": "Mobile view",
            "style-panel": "Style panel",
            "spacing": "Spacing",
            "padding": "Padding",
            "margin-bottom": "Margin bottom",
            "alignment": "Alignment",
            "size-and-color": "Size & color",
            "body": "Body",
            "background": "Background",
            "content": "Content",
            "border-width": "Border width",
            "border-color": "Border color",
            "radius": "Radius",
            "size": "Size",
            "color": "Color",
            "align-left": "Align left",
            "align-center": "Align center",
            "align-right": "Align right"
        }
    }
}
You can change the language values to your own, for example when you start the editor like this:
Redactor('#entry', {
    plugins: ['email', 'blockcolor', 'blockbackground',
      'blockborder', 'blockfontsize', 'imageresize',
      'mergetag', 'alignment', 'emoji'],
    pathbar: true,
    lang: 'sv',
    translations: {
        sv: {
            "email": {
                "button": "Knapp",
                "mobile-view": "Mobilvy",
                "style-panel": "Stilpanel",
                "spacing": "Avstånd",
                "padding": "Utfyllnad",
                "margin-bottom": "Marginal nedtill",
                "alignment": "Justering",
                "size-and-color": "Storlek och färg",
                "body": "Body",
                "background": "Bakgrund",
                "content": "Innehåll",
                "border-width": "Gränstjocklek",
                "border-color": "Gränslinjens färg",
                "radius": "Radie",
                "size": "Storlek",
                "color": "Färg",
                "align-left": "Vänsterjustera",
                "align-center": "Mittenjustera",
                "align-right": "Högerjustera"
            }
        }
    }
});
This example shows running Redactor with Swedish and with the plugin translated into Swedish.
See more details on how to customize the languages.
Revolvapp templates to Redactor #
If you have Revolvapp templates, here's a simple tool to convert them to HTML for Redactor.